Scrap value

This pattern is taken from ‘Successful Scrap Quilts from Simple Rectangles’ by Judy Turner & Margaret Rolfe.

Sort out scrap fabrics into lights and darks. You can have a colour theme: e.g. autumn colours, pastels, brights.

Cut fabric pieces to measure 3 1/2” x 2”. This was a collection of mostly blues. Accurate cutting and stitching is essential.

Using 1/4” inch seams hand or machine stitch pieces together into threes as follows: 2 lights joined along the long side, then a dark piece joined across the top. Then two darks and a light. Join the 3’s into strips as in the photograph and then join the strips together. Finish with a border in a plain dark colour to match.foq-block-2012

60 degree quilt

60 degree quilt by Magnolia Bay Quilts

This stunning quilt was made by Kim Brackett of Magnolia Bay Quilts. Although it initially looks like a fiendish triangle quilt, in fact this is a more flexible quilt. The important thing to remember is that every seam is a 60 degree angle, and that your strips should be a consistent width. (click the photo to view larger image)

NB: To create this quilt you’ll need a ruler with a 60 degree marking.

View the full tutorial and lots of helpful tips, visit the Magnolia Bay Quilts website.

New blanket square

The long double pointed needles you can buy now mean that it is possible to hold more stitches on the needle with the weight of the knitting on your lap. So you can make a blanket all in one go. But even so there are advantages in making a blanket out of smaller squares. The traditional blanket made out of knitted squares was a useful way of using up oddments of yarn. Knitting individual squares means that you never have too many stitches on the needle at once. A blanket knitted all in one go can sag and stretch. But, the big problem with the traditional squares was sewing them together as this is difficult to do well. The sewing has to be firm but not lumpy.

However, this pattern allows you to make a blanket out of squares without having to sew them together. The result has a much better tension, drape and feel than a sewn blanket.

Cast on 41 stitches. Knit one row. Turn. The right side of the work is now facing you.
Knit 19. Knit 3 together through back of loops. Knit 19.
Knit one row.
Knit 18. Knit 3 together through back of loops. Knit 18.
Continue in this way until 3 stitches remain. Knit 3 together and fasten off.

This is your first square and will be on the bottom left hand corner of the finished blanket with the line of knit 3 tog stitches going from bottom left to top right.new-blanket-square-1

To make the next square, cast on 21, preferably with thumb method, and, with the stitches on the right hand needle, pick up 20 stitches along the right hand side of the first square. Work the second square on these stitches. Make as many squares as you want on the bottom row.

To make the left hand square on the next row, pick up 20 stitches along the top of the first square then cast on 21 stitches, using a ‘knitting on’ technique so you are going left to right. Work the square on these stitches.

For the next, and all subsequent squares on that row, pick up 20 stitches on the top of the square below, one stitch right in the corner and 20 stitches up the right hand side of the previous square. Make as many rows as you want.

Weave in as many ends as you can while working, fasten off any remaining ends. To finish it off really neatly, use a long double pointed needle and pick up 20 sts along each square on one side. Knit 3 or 5 rows and cast off all but the last stitch. Pick up 3 or 5 sts along the side you have just knitted then 20 sts along each square on the next side and repeat. Do the same for the remaining two sides.

Simple weighted quilt

This is to comfort children with severe sleeping problem such as those caused by autism or various conditions where the sensory system is disturbed. A smaller version can also be used as a lap quilt for children who cannot sit still.

The use of a weighted quilt and the size and weight should be at the recommendation of a doctor or medical social worker. Three typical sizes are given but they can be adjusted to suit the needs of the child. A false back is sewn on to a quilt with the result being a cross between a quilt and duvet stitched to its cover. The weight is provided by sandbags stitched into pockets which are velcro’d to the back of the quilt and covered by the false back. These can be removed when the quilt is washed.

Materials
Economy mattress protector or similar ready quilted base. 2’ x 3’, 3’ x 4’6” or 4’6” x 6’. Good quality sheeting or lightweight curtain fabric – two pieces slightly larger than the finished size. Velcro type fastening – approx 3m, 6m or 10m. Old sheeting or offcuts. Kiln dried sand – 2kg, 4kg or 7kg approx.

Method
Sew strips of the smooth Velcro across the better side of the mattress protector, 3-6” in from the edge and about 9” apart. Lay the bottom piece of fabric face up and the top piece of fabric face down with the mattress protector Velcro side up on top. Line them up and pin. Stitch the layers together along the sides and top and part way in from the bottom corners, leaving enough open to turn right sides out once the seams have been trimmed. Once it is right side out, stitch again ½” in from the edge to hold the layers firmly in place. Sew Velcro across the open end, taking care to stitch both the mattress protector and the top fabric to one piece of Velcro and turn in the edges of the bottom fabric under the other piece. This is to close the quilt in use.

Cut strips of sheeting 9” deep and a little wider than the Velcro strips. Make a small hem along the long edges. Sew a strip of the rough Velcro 2” from one long edge. Fold with the Velcro inside and stitch the short ends. Turn right side out and sew across at intervals to make pockets roughly 4-6” wide. Cut sheeting, or offcuts, into rectangles 8” x 3.5”, fold widthways and stitch the two sides to make a bag. Turn right side out. Spoon in enough sand to nearly fill it. Turn the top over and hand stitch to close. Put a sandbag into each pocket and sew across the top of the pockets. Use the Velcro to attach the filled pockets to the inside of the quilt.

A video showing a similar method of making the quilts is available here: http://www.youtube.com/watch?v=ndwjSkVfV1g

Incubator covers

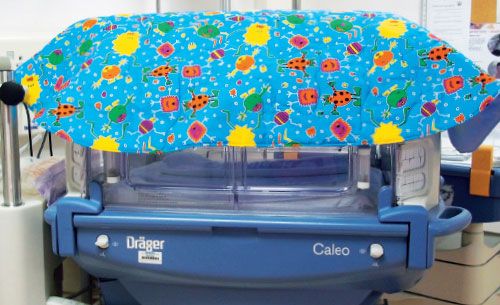
Incubator covers are designed to protect the baby from the bright hospital lights and to create a homely atmosphere. There are two different patterns below, based on the requirements of hospitals in different areas. Please check with your local Linus coordinator about which is best in your area before sewing.

Pattern One

This pattern is used for the Royal Worcester Neo-Natal Unit, and is kindly provided by local coordinator Lynne Adams.

Linus incubator cover

The incubator cover is essentially a roundcornered rectangle measuring approx 94 x 127cm (37 x 50in). A quarter-circle template with a radius of approx 38cm (15in) is ideal for rounding the corners.

The covers must be machine washable up to 60 degrees, so cotton fabrics are ideal. Any colour is fine, but please don’t use plain white fabric as a backing because it reflects the light which can be quite harsh. Polyester wadding can be used; quilting thread should be cotton or polyester. The quilting should not be too dense. As the corners are rounded, you will need to use bias binding.

If you are short of time, or don’t wish to bind your cover before quilting it, you can use the ‘bagging out’ or ‘pillowcase’ method to finish the quilt edges. If you wish to use the ‘bagging out’ or ‘pillowcase’ method instead of binding your quilt, the rectangles need to be cut 38 x 51in to provide a 1⁄2in seam allowance. With the cover top and back right sides together, place the wadding on top of wrong side of the cover top. Pin to secure and then stitch all round leaving a gap of approx 12in.

Remove the pins and turn the quilt through to the right side. Turn the raw edges of the gap under and slipstitch closed, or topstitch the gap closed approx 1⁄8in from the edge. Then quilt the cover.
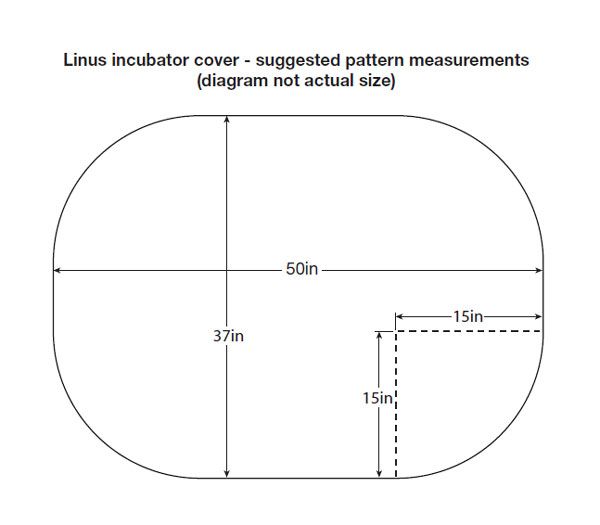
Linus incubator cover pattern


Pattern Two

This pattern is used in Birmingham and the West Midlands, and was kindly provided by local coordinator Joy Edgington.

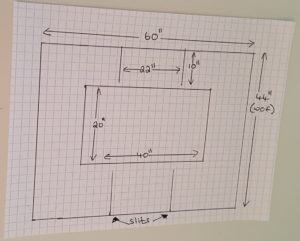
Quilt Top: 60” x 44” child friendly cotton print fabric
Quilt wadding: 40” x 20”
Quilt back: 60” x 44” white/cream cotton fabric or sheeting

Incubator cover measurements


To Make
Assemble layers. The quilted area sits on top of the incubator, so the wadding goes in the centre with 10” either end of the long side and 12” either side on the width. You can quilt this top area as you like and also the sides, avoiding the slits.

Please note that there are slits required on either side of the cover for observation purposes. There are 4 slits each 10 “ long and 9” from the end of the wadding. The centre 22” of each side can thus be lifted up, allowing the nurse a clear view of the baby.